Goland(Jetbrains Idea平台)插件开发教程(一)
前言
感觉之前分享的Goland插件开发小记不够详细,现在打算做个系列教程来介绍一下。我之前开发的插件是针对公司内部框架做了一些快速初始化模块、repo层构建、接口添加、自动生成query代码等等。
Getting Started
开发Goland插件需要使用Idea,毕竟Jetbrains平台的IDE都是基于Java平台开发的。
新建项目
首先建议把Goland整个目录复制一份到其他地方,作为调试的环境。
虽然Idea在新建项目里有Intellij Platform Plugin这一项,但是并不建议从这里创建。因为从这里创建的不是Gradle的项目,个人感觉添加其他依赖比较麻烦。
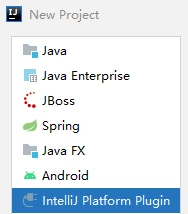
个人比较建议从Gradle下的IntelliJ Platform Plugin新建
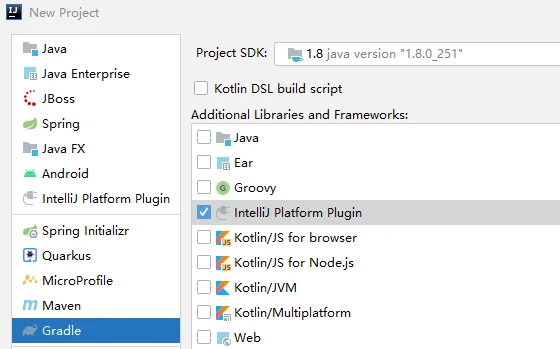
接下来就是一路Next了,但是先不要构建gradle。为了支持goland需要修改!
修改build.gradle
由于我们是要开发Goland的插件,所以需要做出一些修改。
为了添加java支持,在plugin下添加java,jetbrains的插件版本改为1.0
intellij 标签下改为下面的内容,localPath指向之前复制出来的goland环境
此外,plugin.xml里的Id也改为build.gradle中的group
1
2
3
4
5
6
7
8
9
10
11
12
13
14
15
16
17
18
19
20
21
plugins {
id 'java'
id 'org.jetbrains.intellij' version '1.0'
}
group 'cn.huihongcloud.golandplugin'
version '1.0-SNAPSHOT'
// See https://github.com/JetBrains/gradle-intellij-plugin/
intellij {
type = "GO"
plugins = ["go"]
localPath = "D:\jetbrains\goland\201.8538.43"
}
repositories {
mavenCentral()
}
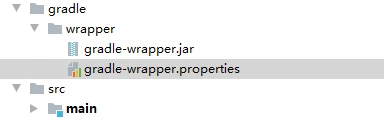
可能默认的gradle是比较旧的版本,如果构建出现版本的问题,建议自己在项目目录下创建gradle-wrapper.properties。我选择的版本是本机已经有构建过的,下面也贴出来让大家参考。
1
2
3
4
5
6
distributionBase=GRADLE_USER_HOME
distributionPath=wrapper/dists
distributionUrl=https://services.gradle.org/distributions/gradle-6.7.1-bin.zip
zipStoreBase=GRADLE_USER_HOME
zipStorePath=wrapper/dists
然后就是坐等构建了。如果没啥问题的话,运行项目就会启动我们调试环境的goland。
编写第一个Action
为了能让源文件打包进插件,我们还要修改
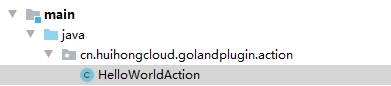
添加HelloWorldAction
1
2
3
4
5
6
7
public class HelloWorldAction extends AnAction {
@Override
public void actionPerformed(@NotNull AnActionEvent anActionEvent) {
}
}
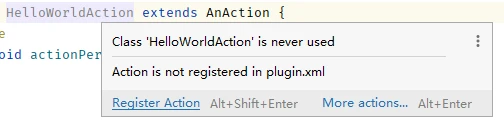
将鼠标移动到类名上,可以看到这样的提示,让我们注册到plugin.xml
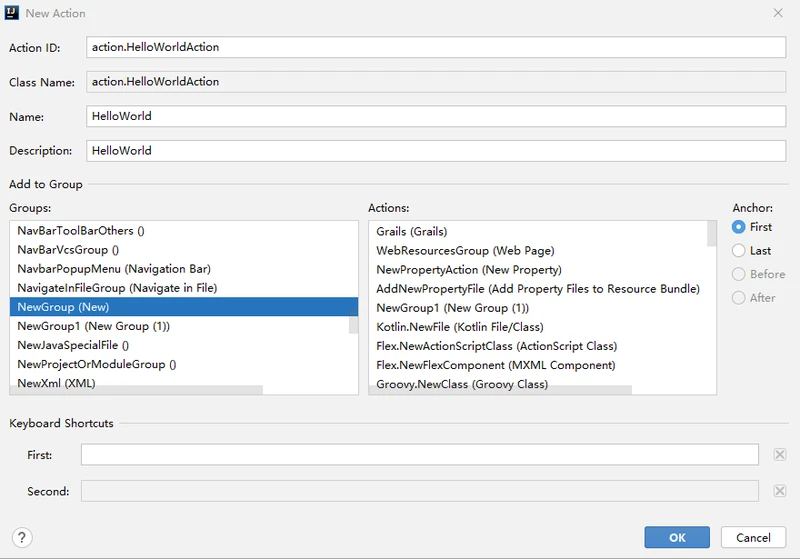
为了能在Goland中显示出来,我们就需要注册了。下面我的配置是加到New菜单中。
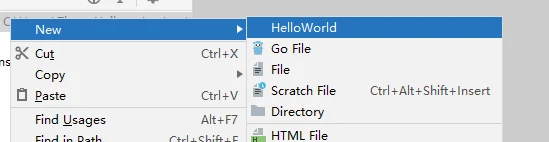
接下来直接在Idea中运行,打开Goland的New菜单就可以看到我们添加的内容了
为Action增加功能
创建并打开文件
在之前的小记中提到过VirtualFile,这时候可以通过AnActionEvent获取VirtualFile了
1
VirtualFile vf = anActionEvent.getData(PlatformDataKeys.VIRTUAL_FILE);
这里获取到的VirtualFile即是我们右击的目录了
下面我们通过获取到的VirtualFile,在这个目录下创建一个文件
1
2
VirtualFile childData = vf.createChildData(this, "HelloWorld.txt");
可以看到文件创建成功了,但是Goland也报错了,这是因为我们在普通的Action中进行了写操作
1
2
3
4
5
java.lang.Throwable: Assertion failed: Write access is allowed inside write-action only (see com.intellij.openapi.application.Application.runWriteAction())
at com.intellij.openapi.diagnostic.Logger.assertTrue(Logger.java:182)
at com.intellij.openapi.application.impl.ApplicationImpl.assertWriteAccessAllowed(ApplicationImpl.java:1288)
at com.intellij.openapi.vfs.newvfs.persistent.PersistentFSImpl.processEvent(PersistentFSImpl.java:698)
at com.intellij.openapi.vfs.newvfs.persistent.PersistentFSImpl.createChildFile(PersistentFSImpl.java:460)
我们需要使用如下方式进行写操作
1
2
3
4
5
6
7
8
WriteCommandAction.runWriteCommandAction(anActionEvent.getProject(), () -> {
try {
VirtualFile childData = vf.createChildData(this, "HelloWorld.txt");
childData.setBinaryContent("Hello".getBytes());
} catch (IOException e) {
e.printStackTrace();
}
});
但是这样建完文件后,并没有直接打开,直接打开可以通过下面的navigate实现
1
new OpenFileDescriptor(anActionEvent.getProject(), childData).navigate(true);
效果如下

简易输入框
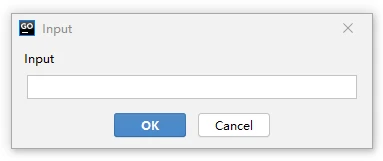
IDE自带了一些简单的Dialog,通过下面的代码可以弹出一个简易的输入框,这样我们就可以利用输入的信息去创建文件了。关闭输入框以及取消返回的都是null,可以通过这样判断用户是否取消操作。
1
String inputData = Messages.showInputDialog("Input", "Input", null);
效果如下
小结
本次介绍了如何配置Goland插件的开发环境,以及如何创建Action并实现写入文件的Demo。我在自己的插件中是通过这种方式实现了快速创建模块,点击菜单并输入模块的基础信息,就自动建立各种目录和基础文件。