Python库安装/更新/卸载+Anaconda/pip/Pycharm/Git/GitHub使用+添加/删除镜像源+常见问题汇总
包/库安装/更新命令
pip是用于安装和管理软件包的包管理器,无法对环境进行管理;conda是包及其依赖项和环境的管理工具,建议使用conda;pip可以安装conda无法安装的包,conda也可以安装pip无法安装的包;如果想在指定环境中安装包,需要先切换到指定环境中,再使用命令安装包;建议为每一个项目建立一个环境来统一管理该项目所需要的包,不要把所有包都安装在base环境下,会很卡!!!
Windows 10:打开 Anaconda Prompt 或 按快捷键【Win+R 】打开运行并输入【cmd】后回车打开命令行。
Ubuntu 18.04:按快捷键【Ctrl+Alt+T】打开终端并运行【conda activate】激活Anaconda的base或其他环境Ubuntu系统在终端可以直接执行conda命令,Windows系统在Anaconda Prompt里面才能使用conda命令conda activate / deactivate 环境名激活/退出环境,不加环境名则激活base环境source deactivate / deactivate退出环境至root:Ubuntu / Windowssource activate 环境名 / activate 环境名激活环境:Ubuntu / Windowsconda create --name 环境名 包名创建环境conda update anaconda / conda更新anaconda / conda到最新版rm -rf ~/anaconda3卸载condapip install --upgrade pip更新pip到最新版conda update --all 或 conda upgrade --all更新所有库conda install / update 库名安装 / 更新库pip install 库名 / pip install 库名 --upgrade安装 / 更新库conda remove 库名 或 pip uninstall 包名卸载库/包conda remove --name 环境名 库名卸载指定环境中的库conda remove --name 环境名 --all删除环境conda --version显示conda版本号conda list 或 pip list查看已安装的包/库的信息conda info --envs 或 conda info -e 或 conda env list显示已创建环境 / 查看所有包python进入python交互界面exit()退出python --version 或 python -V查看Python的版本where python查看Python安装位置
安装例子
查看python包的版本
查看当前环境的python版本:python --version
① 查看环境中所有包名和版本
在终端或cmd先进入环境,运行:pip list 或 conda list
② 单独查看某个包的版本
法一:先进入环境,运行:
法二:在该环境下进入python交互界面,运行下面代码
更改base环境的python版本
打开终端,执行指令:conda install python=3.8不建议使用,更新很慢很慢,如果需要使用其他版本的python,建议新建一个conda环境。
注意事项
在jupyter notebook中安装包/库/模块需要在pip前面加!,例如:!pip install gym。即当python需要充当系统级命令时,在python语句前加“!”,其他类似的软件也这样玩;pip install -h:查看pip的其它参数作用;pip install -U 等价于 pip install --upgrade :如果已安装则升级到最新版; pip install --user : 安装在本用户的目录下;pip install pyarrow -Uq :-U等价于--upgrade、q 等价于 --quiet,q可重复3次使用:-q:对输出结果的WARNING, ERROR, CRITICAL记录-qq:对输出结果的ERROR, CRITICAL记录-qqq:对输出结果的CRITICAL记录参考https://stackoverflow.com/questions/64277506/pip-install-options-unclear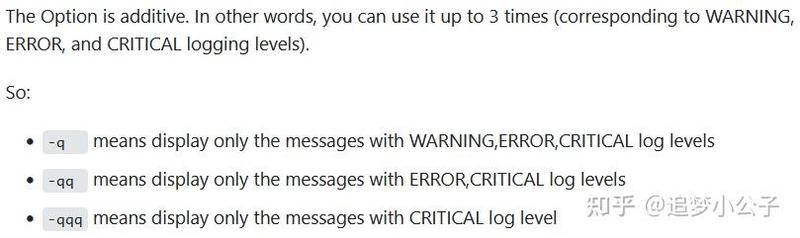 原文截图
原文截图
添加国内镜像源
目的:由于conda/pip的下载源在国外服务器上,由于各种原因直接下载更新速度会比较慢,可以将下载源变成国内的镜像下载源,加快下载速度,当然不换也是ok的。
更换Anaconda下载源
Anaconda 换国内源、删源最全集锦(转载) 运行 Anaconda Prompt
例如:添加清华源,在命令行分别输入下面三行命令,输入一行按一次回车Enter
添加中科大源
添加上交大源
2. 设置搜索时显示通道地址
3. 查看是否添加上了源
更换pip下载源
修改pip下载源_更换pip下载源_ctrl+c、v的博客-CSDN博客打开终端,输入以下命令
临时方法:下载时加入参数 -i [镜像源地址]
长期方法:
pip国内镜像源:
删除Anaconda配置的镜像源
运行 Anaconda Prompt
先查看已使用哪些镜像源
逐一删除镜像源
例如:删除中科大源conda config --remove channels Index of /anaconda/pkgs/free/conda config --remove channels Index of /anaconda/pkgs/main/
新建conda环境并配置到pycharm
1、在命令行终端新建conda环境
例如新建一个叫pytorch的环境
在Windows的Anaconda Prompt 或 macOS/Linux的终端输入conda create -n pytorch python==3.8
激活环境conda activate pytorch注:运行conda activate则直接激活anaconda的base环境
退出环境conda deactivate
删除环境conda remove -n pytorch --all
2、利用pycharm创建conda环境,并配置到pycharm中使用
File --> Settings --> Project --> Python Interpreter --> 右边小齿轮:Add --> Conda Environment --> New environment --> 创建一个名叫Paddle,python版本为3.8的环境。 --> OK:等待配置完成 --> OK或者:点击pycharm主界面的右下角:python 3.6 (pytorch) --> Add Interpreter 也可以到达下图的界面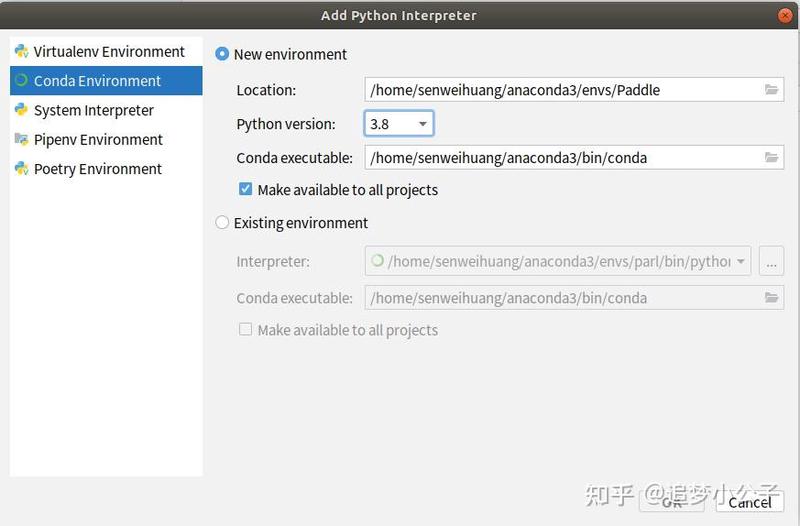 Add Python Interpreter界面
3、在Pycharm中使用Anaconda创建的虚拟环境
跟上面的类似,首先找到Add Python Interpreter界面下的Conda environment
① File --> Settings --> Project --> Python Interpreter --> 右边小齿轮:Add --> Conda Environment
② Existing environment --> Interpreter --> 单击右边的 ··· --> 找到: /home/senweihuang/anaconda3/envs/Paddle/bin/python --> OKpycharm2022直接配置Conda executable路径后就会直接显示可用的conda环境,直接选择就可以。先找到anaconda的安装目录anaconda3,有一个统一管理环境的目录叫envs,找到你的Paddle环境下的bin目录里面的python.exe,如果没有bin文件夹则python.exe会放在Paddle文件夹下。另外,如果是base环境的话,一般在安装目录下的bin文件夹,例如/home/senweihuang/anaconda3/bin/python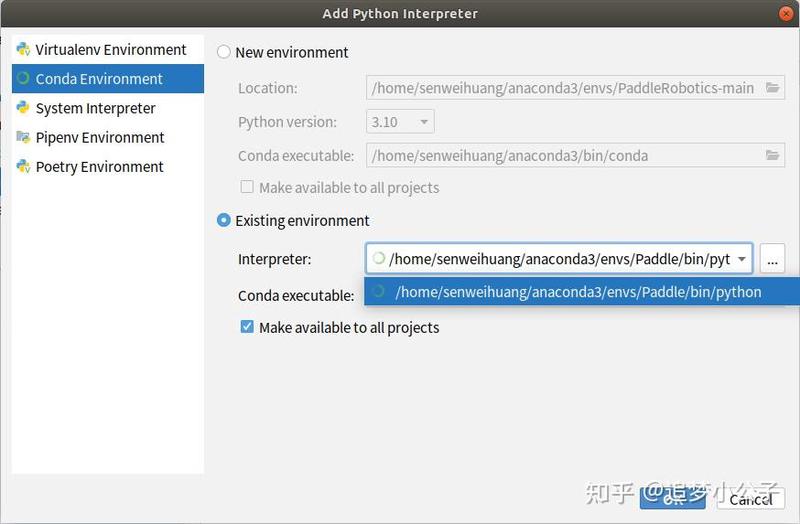 Add Python Interpreter界面注:如果没有找到Existing environment,则需要先配置Conda executable的路径,找到Anaconda安装目录下的Scripts文件夹下的conda.exe,然后load一下。否则会报错Error code : 2 . D : Software Setupvanaconda \ Setup Anacondas envs \ sb3 \ python . exe : cant open file F : Software Setup \ Pycharm \ Pycharm Setup \ Pycharm Community Edition2020 . 3vbr \ bin \ info : [ Errno 2 ] No such file or directory
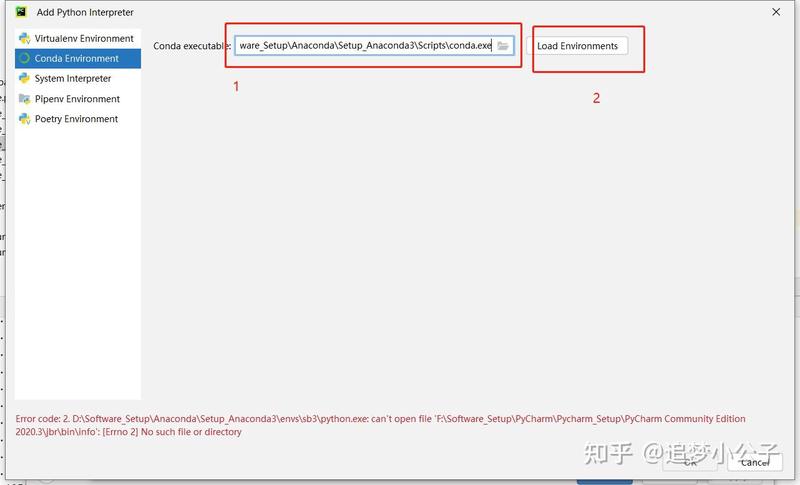 注:System Interpreter为电脑系统默认的解释器,当需要使用电脑系统安装的某些软件库时使用,比如PySide2和PyQt5库需要系统安装的QT链接,则需要使用系统解释器。
环境的导出与导入:用于快速配置环境
导出conda环境
例如导出pytorch环境,并命名为env,保存在当前工作目录下
conda env export > 文件路径/文件名称.yaml
导入conda环境
conda env create -f 文件路径/文件名称.yaml如果想修改环境名称,打开yaml文件更改name字段后面的内容
导出pip环境
pip freeze > 文件路径/文件名称.txt
导入pip环境
pip install -r 文件路径/文件名称.txt
Git/GitHub使用
需要安装Git:超详细Git 安装教程(Windows)
命令语法
返回上一级目录:cd ..查看配置:git config -l退出命令:Qgit push -u origin main # 第一次推送时git push origin main # 把本地代码推到远程 main 分支git pull origin main # 把远程最新的代码更新到本地移除通过git add添加到临时缓存区的文件:git rm --cached移除通过git commit命令提交到本地Git仓库的文件(仅仅是撤回commit操作,仍然保留写的代码):
① 不删除工作空间改动代码,撤销commit,并且撤销git add . 操作
② 不删除工作空间改动代码,撤销commit,不撤销git add .
③删除工作空间改动代码,撤销commit,撤销git add . ,即恢复到上一次commit状态。
HEAD^表示上一个版本,等价于HEAD~1,如果进行了2次commit,想都撤回,可以使用HEAD~2。如果commit注释写错了,只是想改一下注释,只需要:git commit --amend,进入默认vim编辑器,修改注释完毕后保存就好了。
从Github上克隆项目到本地电脑
① 在指定文件夹内空白处鼠标右键,选择Git Bash Here,打开Git Bash终端;② 在Git Bash终端输入git init命令,初始化本地仓库,如果该文件夹之前初始化过就可以略过这步;③ 在Git Bash终端输入git clone url,url为项目的Github地址,如果项目有环境配置文件(setup.py等),克隆成功后还需要在终端进入项目文件夹,运行pip install -e .
注:如果要对项目的子模块进行下载,需要加参数,即
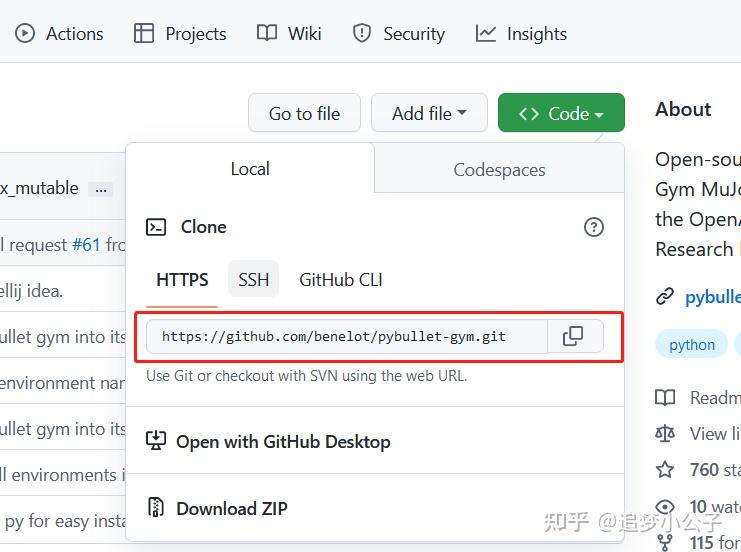 URL
URL
更新本地电脑中从Github上克隆的项目
① 在需要更新的项目文件夹内空白处鼠标右键,选择Git Bash Here,打开Git Bash终端;② 在Git Bash终端输入git pull命令,运行即可。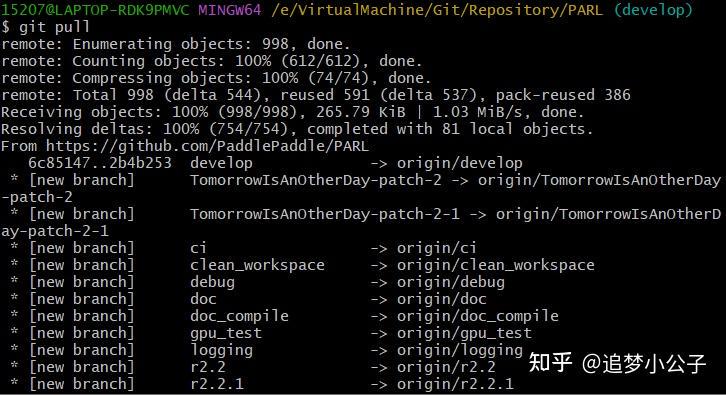 用git pull更新git项目
上传本地仓库文件夹文件至GitHub仓库
上传本地电脑文件夹文件至GitHub仓库
Git问题记录
1、问题:fatal: unable to access 'https://github.com/PaddlePaddle/PARL.git/': Failed to connect to GitHub: Let’s build from here port 443 after 21106 ms: Couldn't connect to servererror: RPC failed; curl 28 OpenSSL SSL_read: Connection was reset, errno 10054fatal: expected 'packfile'解决:
2、问题:Failed to connect to http://github.com port 443 after 21098 ms: Timed out解决:
常见问题记录
1、在cmd命令行安装pytorch后,显示已经成功安装,且可以导入import其相应的库,运行下面程序也没有问题。但是在jupyter notebook编辑代码,却无法导入库、编译程序。
原因: 因为从anaconda直接打开jupyter,jupyter编译器使用的是base环境下的python,而我们要使用的是pytorch环境下的python,因此打开jupyter之前还要激活环境。
解决: 在cmd命令行输入命令:
按Enter回车后,进入 pytorch 虚拟环境, 再输入命令:
安装成功后, 再输入命令:
等待浏览器自动打开jupyter notebook页面, 再编写pytorch程序就可以运行了。
2、安装或更新库时显示 HTTP error,如下图所示。
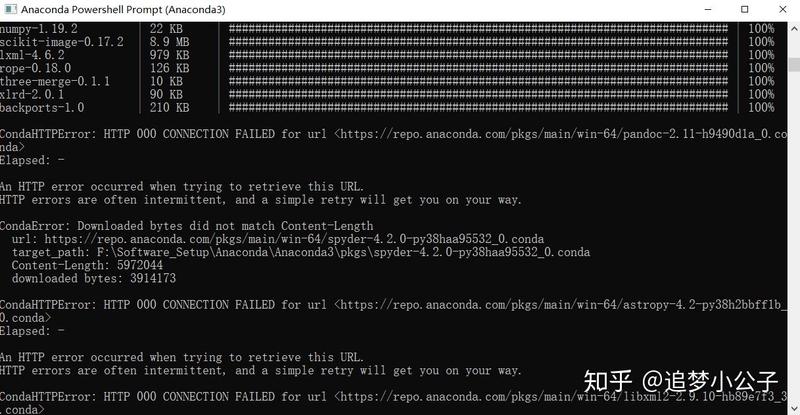 HTTP error
原因:网络或镜像源出现问题,因为国内的镜像源并不是一直都稳定,所以有时候会崩掉。
解决:确保conda的镜像源已经切换到国内的镜像源,重新安装更新,具体参见前面的换源教程。切换不同的国内镜像源,重新安装更新。如果经过上述两个步骤后,还是出现HTTP error,再多尝试几次安装更新的命令,耐心等待;若实在不行就不要添加国内镜像源更新了,删除所有镜像源后直接安装更新。
3、anaconda更新后出现两个jupyter notebook
 出现两个jupyter notebook
原因:应该是因为我修改过jupyter notebook的路径导致的,待验证。
解决:现在不影响使用,待有空再解决......
4、采用pip install --upgrade pip更新pip时提示错误ERROR: Could not install packages due to an EnvironmentError: [WinError 5] 拒绝访问。: 'f:\\software_setup\\python\\python_setup\\scripts\\pip.exe'Consider using the `--user` option or check the permissions.

原因:Win10 对 Python 安装位置的系统权限限定问题。
解决:
随后又报错:ModuleNotFoundError: No module named 'pip'
原因:原因是前面更新pip的时候被强行killtask了,导致pip命令用不了,可以通过两行简单的cmd命令行语句进行改正修复。
解决:
5、采用pip install pillow安装pillow,并提示成功安装,但是提示错误ModuleNotFoundError: No module named 'PIL'
解决:先卸载,后重装。
6、采用pip install pillow==7.2.0安装7.2.0版本的pillow,提示错误Pillow 7.2.0 does not support Python 3.9 and does not provide prebuilt Windows binaries.
解决:Python版本不对,安装Python 3.8及以下的版本
7、采用pip install gym/gym[all]安装gym,提示如下错误The headers or library files could not be found for zlib, a required dependency when compiling Pillow from source.Please see the install instructions at: Pillow (PIL Fork) 8.2.0.dev0 documentationERROR: Command errored out with exit status 1: ...... Check the logs for full command output.
原因:在安装pillow这一步时安装7.2.0版本的pillow不成功导致
解决:先安装好pillow7.2.0版本
8、Ubuntu18.04,pip安装parl库时报错
error: command 'g++' failed: No such file or directoryerror: command 'gcc' failed: No such file or directoryerror: command '/usr/bin/gcc' failed with exit code 1ERROR: Failed building wheel for pyzmq
解决:终端输入: sudo apt install --reinstall gccsudo apt install g++
9、ERROR: pip's dependency resolver does not currently take into account all the packages that are installed. This behaviour is the source of the following dependency conflicts.spyder 5.1.5 requires pyqt5<5.13, which is not installed.spyder 5.1.5 requires pyqtwebengine<5.13, which is not installed.
解决:pip install pyqt5==5.12.3pip install pyqtwebengine==5.12.1
10、pip install cv2 报错
问题:ERROR: Could not find a version that satisfies the requirement cv2 (from versions: none)ERROR: No matching distribution found for cv2
解决:pip install opencv-python
原因:用的时候叫 cv2,但是安装的时候叫 opencv
11、parl运行并行计算测试代码报错
错误1:AttributeError: 'NoneType' object has no attribute 'ZMQError'
解决:在conda新建一个python3.8的虚拟环境使用,并卸载paddle。
原因:python版本太高,没有合适的zmq版本兼容。paddle安装有问题,这部分代码不依赖于paddle,先把环境里的paddle删除掉试试看。
错误2:Fork support is only compatible with the epoll1 and poll polling strategies
解决:pip install grpcio==1.43.0
原因:版本不兼容
错误3:ImportError: sys.meta_path is None, Python is likely shutting down
解决:下面的代码需要在终端执行,不能通过os.system在python程序中执行
原因:PARL的集群启动应该在终端执行,在python代码执行xparl stop,会直接杀掉所有并行进程,导致不可预期的错误。
12、pip安装包时出现MemoryError
问题:pip install torch时,安装包下载完后,直接报错,报错最后一行出现MemoryError。
解决:pip install --no-cache-dir torchpip有个“–no-cache-dir”失能缓冲参数
原因:
pip安装有个缓存机制,即先把安装库的整个文件缓存到内存后才开始安装,如果在限制缓存大小的环境中安装较大的安装包就会导致内存不足,出现MemoryError错误, 只需要在安装时指示不启用缓存机制就可解决问题。
13、interrupted by signal 9: SIGKILL
问题:在虚拟机ubuntu18.04,pycharm中运行代码,一觉醒来发现跑了517110遍后报错了[04-27 07:07:15 MainThread @train.py:368] Total Steps: 517110 Reward: 176.07160152402048Process finished with exit code 137 (interrupted by signal 9: SIGKILL)
原因:内存不足 或 cpu不够用而导致程序运行失败,系统强制杀死进程。将batch_size改小一点,不要把大批量的数据一次性读入内存。
还有另外一个原因:电脑长时间无操作锁屏了。
解决:电源 --> 节电 --> 空白屏幕 --> 从不
14、AttributeError: module 'time' has no attribute 'clock'
解决:将 t0 = time.clock() 替换为 t0 = time.perf_counter()
原因:python3.8不支持clock了
15、 安装mujoco_py时报错:ValueError: check_hostname requires server_hostname
解决:关闭所有VPN工具
原因:启动了VPN工具导致网络异常
16、WARNING: Ignoring invalid distribution -yzmq (d:\software_setup\anaconda\setup_anaconda3\lib\site-packages)
在Anaconda Prompt使用pip安装时出现警告,忽略无效的分发-yzmq
解决:找到提示的路径找到site-packages文件夹,然后删除文件夹:~yzmq-18.1.1-py3.9.egg-info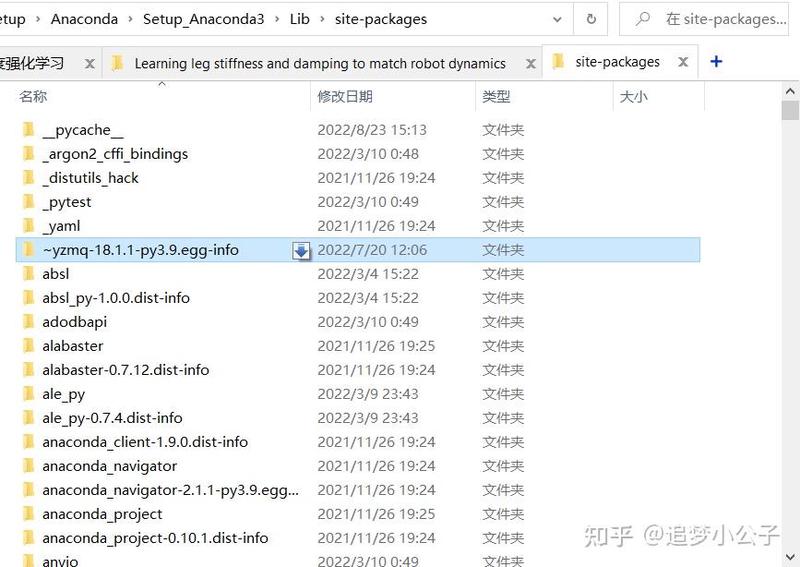
原因:之前安装插件失败中途退出,导致插件安装出现异常导致
17、Pycharm终端提示:
. : 无法加载文件 C:\Users\15207\Documents\WindowsPowerShell\profile.ps1,因为conda : 无法将“conda”项识别为 cmdlet、函数、脚本文件或可运行程序的名称。请Please open Anaconda prompt, and run `D:\Software_Setup\Anaconda\Setup_Anaconda3\condabin\conda.bat init powershell` there.
按照提示到Anaconda prompt运行了D:\Software_Setup\Anaconda\Setup_Anaconda3\condabin\conda.bat init powershell也没解决。
解决:以管理员身份打开PowerShell 运行:set-executionpolicy remotesigned,然后输入:y,再回车。
18、运行:model = model.load(f"{log_dir}/best_model"),报错:'Box' object has no attribute 'shape'
解决:[Bug] on loading trained agent(td3), raised error: 'Box' object has no attribute 'shape' · Issue #681 · DLR-RM/stable-baselines3
原因:stable-baselines3和gym版本不兼容,或者训练时用的torch版本和加载时的torch版本不同导致。
stable-baselines3 1.4.0 requires gym<0.20,>=0.17, but you have gym 0.26.2 which is incompatible.
19、error: subprocess-exited-with-error
解决:pip install --upgrade pip setuptools==57.5.0
参考:https://stackoverflow.com/questions/72641804/pip-install-regressors-error-is-python-setup-py-egg-info-did-not-run-suc
20、Could not find module \atari_py\ale_interface\ale_c.dll (or one of its dependencies)
解决:
参考:https://stackoverflow.com/questions/63080326/could-not-find-module-atari-py-ale-interface-ale-c-dll-or-one-of-its-dependenc
21、NameError: name 'glPushMatrix' is not defined
解决:
22、更新conda时报错
运行:conda update -n base -c conda-forge conda
报错:RemoveError: 'pyopenssl' is a dependency of conda and cannot be removed from conda's operating environment.
解决:
要在base环境下更新,参考:RemoveError: 'pyopenssl' is a dependency of conda and cannot be removed from conda's operating environment
23、导入pybullet时报错
运行:import pybullet as p
报错为:ImportError: numpy.core.multiarray failed to import
在pycharm的代码界面提示没有pybullet的包,但是查看当前环境下确实安装了pybullet==3.0.8
解决:将鼠标移动到红色波浪线的代码处,根据pycharm的提示的快速解决方案,重新安装pybullet。
安装最新版本:pybullet 3.2.0
24、在Ubuntu20.04系统中用Pycharm运行使用PySide2和PyQt5库的项目
报错为:qt.qpa.plugin: Could not find the Qt platform plugin "xcb" in ""
This application failed to start because no Qt platform plugin could be initialized. Reinstalling the application may fix this problem.
原因:我将Pycharm项目的运行环境设置为了Anaconda的base环境,而PySide2和PyQt5库需要使用系统安装的QT软件链接,而base环境中无法链接到。
解决:
法1:修改项目的解释器为System Interpreter点击pycharm界面右下角解释器 --> Add Interpreter --> Add Local Interpreter --> System Interpreter --> OK。点击pycharm主界面右下角的解释器 --> Interpreter Settings --> 点击+号安装项目所需的其他库。
法2:通过终端运行程序,注意在终端运行时不要进入Anaconda的任何环境,如果打开终端时默认进入base环境先运行conda deactivate退出。
25、AttributeError: module 'numpy' has no attribute 'float'.
`np.float` was a deprecated alias for the builtin `float`. To avoid this error in existing code, use `float` by itself. Doing this will not modify any behavior and is safe. If you specifically wanted the numpy scalar type, use `np.float64` here. The aliases was originally deprecated in NumPy 1.20; 这个错误是因为你的代码(或你使用的某个库)试图访问 模块中不再存在的 属性。从 NumPy 1.20 版本开始, 被弃用,因为它只是内置的 类型的一个别名,而且使用它可能会引起混淆。错误信息建议,如果你需要一个浮点数类型,应该直接使用 ,或者如果你需要一个 NumPy 的具体浮点数标量类型,应该使用 。
ERROR: pip's dependency resolver does not currently take into account all the packages that are installed. This behaviour is the source of the following dependency conflicts. pandas 2.0.3 requires numpy>=1.20.3; python_version < "3.10", but you have numpy 1.20.0 which is incompatible.这个错误信息指出 版本 2.0.3 需要 版本至少为 1.20.3(在 Python 版本小于 3.10 的情况下),但你当前安装的是 1.20.0,这导致了依赖冲突。为了解决这个问题,你需要升级 到至少 1.20.3 版本。
解决:
26、ModuleNotFoundError: No module named 'tensorboard'
这个错误信息表明在尝试运行你的训练脚本时,Python无法在你的环境中找到名为的模块。是TensorFlow的一个组件,用于可视化训练过程中的各种指标,但它也可以独立于TensorFlow使用,例如与PyTorch一起使用。
解决:pip install tensorboard
27、AttributeError: module 'distutils' has no attribute 'version'
这个错误信息表明 Python 在尝试从 模块导入 时遇到了问题。这通常不应该发生,因为 是 Python 标准库的一部分,它提供了版本号比较的功能。
显式安装 :虽然 通常作为Python标准库的一部分而自动可用,但如果遇到问题,也可以尝试显式安装或更新 ,它包含了必要的 功能:
1. 确认 可用
(rl-go2) xxx@xxx:~/unitree_rl_gym/legged_gym/scripts$ python -c "import distutils; print(distutils.__file__)" /home/xxx/anaconda3/envs/rl-go2/lib/python3.8/site-packages/setuptools/_distutils/__init__.py
输出显示 实际上是从 包中的 子目录导入的。这种情况通常发生在较新版本的 中,其中 尝试替换标准库中的 以提供更多功能或修复。然而,这种替换有时可能导致与期望的 行为不一致的问题,特别是在一些依赖特定 特性的代码中。考虑到这一点,这个问题可能是由于新版本的 引入的变化,这些变化可能与你的环境中其他包的期望不兼容。
2. 降级 :最新版本的 引起了问题,尝试降级到一个较旧的版本可能有帮助。可以先卸载当前版本的 ,然后安装一个特定的、较旧的版本:
完美解决
28、ImportError: libpython3.8.so.1.0: cannot open shared object file: No such file or directory
在安装Isaac Gym Preview 4,后运行python 1080_balls_of_solitude.p遇到的报错
解决:把anaconda3下的libpython3.8.so.1.0复制到/usr/lib/x86_64-linux-gnu目录下
参考:【linux】ImportError: libpython3.7m.so.1.0: cannot open shared object file: No such file or directory
https://github.com/PaddlePaddle/Paddle/issues/48428【linux】ImportError: libpython3.7m.so.1.0: cannot open shared object file: No such file or directoryhttps://github.com/PaddlePaddle/Paddle/issues/48428
29、RuntimeError: nvrtc: error: invalid value for --gpu-architecture (-arch)
在跑强化学习训练的时候遇到的:python train.py --exptid xxx-xx-WHATEVER --device cuda:0
解决:先卸载已有torch环境,安装torch==1.13.1版本
参考:记录使用ChatGLM大模型时出现RuntimeError: nvrtc: error: invalid value for --gpu-architecture (-arch)解决
总结记录自己的一些实践经验,学到新知识再来补充......