目录
- 引言
- 写入kml gps点
- 奥森10km 轨迹图
引言
前两天在知乎上面找海外骑行、跑步软件Strava的时候,看到一个将运动轨迹从A App 导出,导入到B APP的工具 APP RunGap,恰巧之前给台湾、印度那边的测试同事处理他们的问题时,写过这样的一个工具,KML文件导出,然后在Mac下的 Google 地球上看轨迹是否偏差,是否存在坐标类型的转化错误等问题,能够比较快地定位问题。
KML文件,读者有不知道的可以Google一下,它是一种专门存GPS 点数据的xml文件格式。
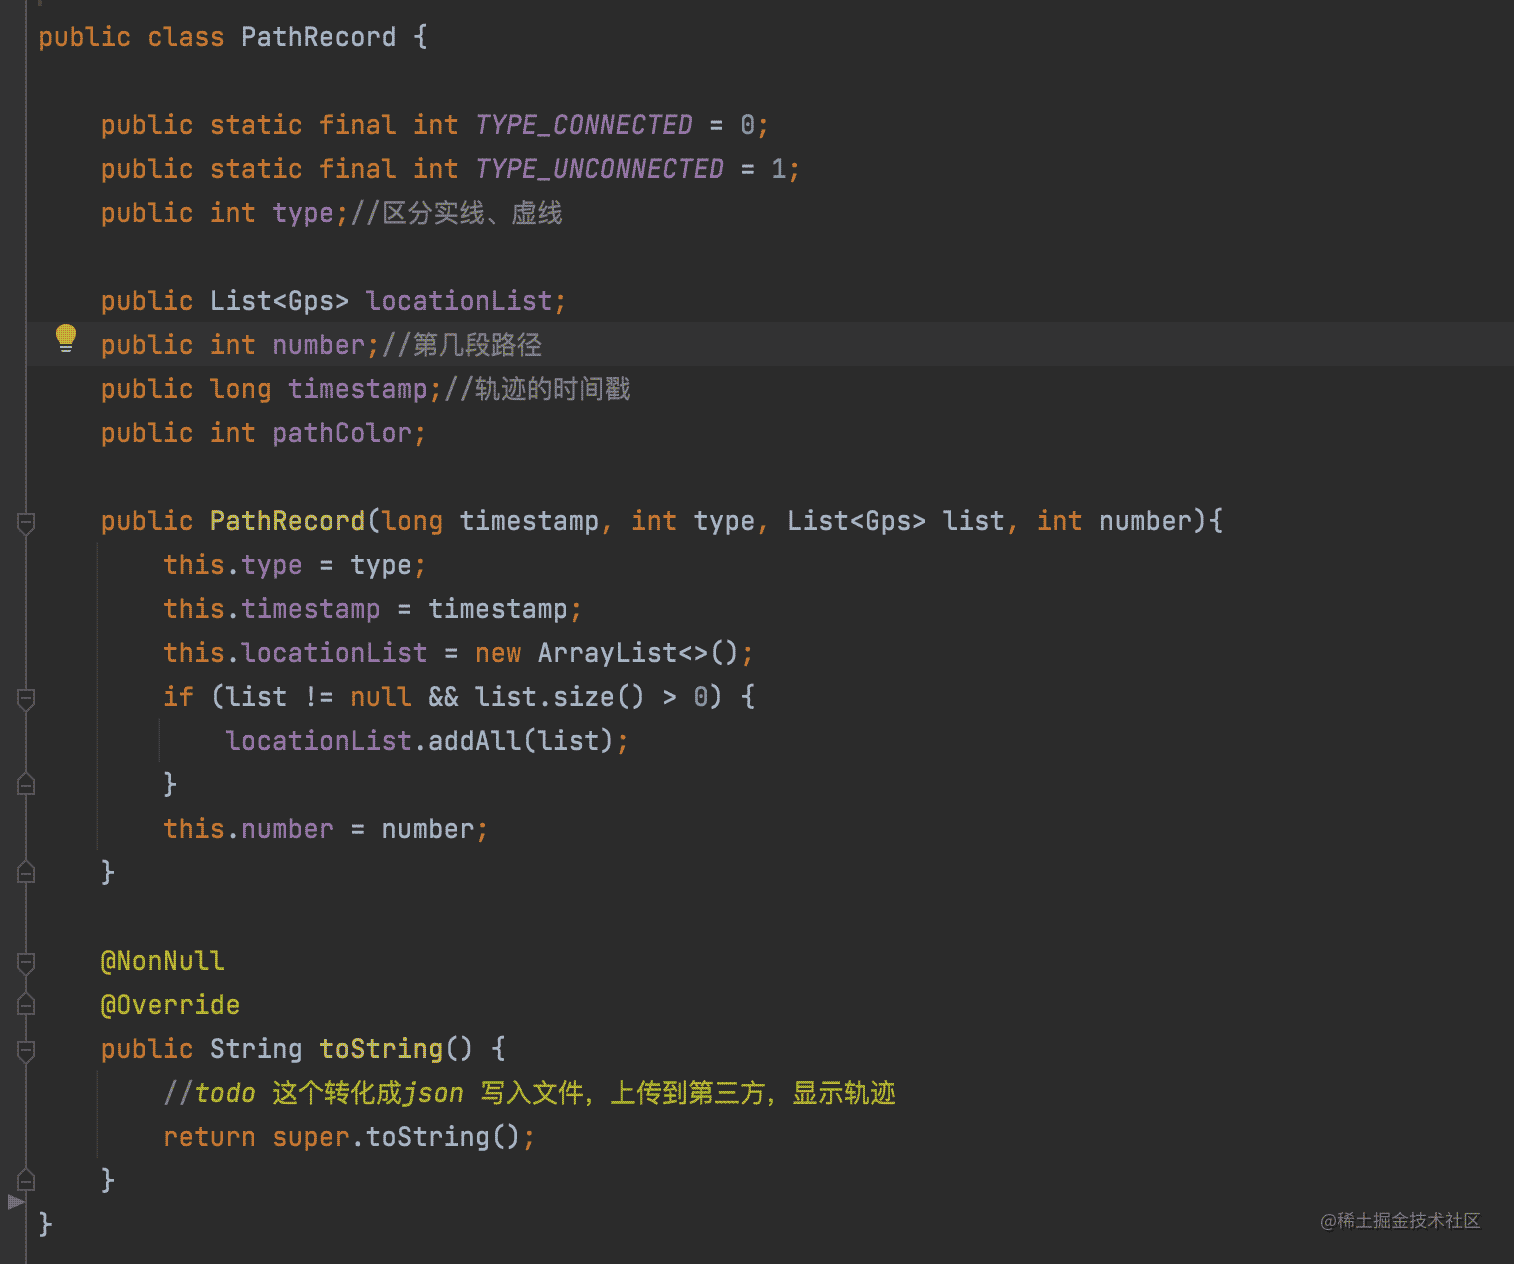
将以下这个数据结构 PathRecord类的GPS点 List 转换成xml:

图 1.0 PathRecord
借用PathRecord的时间戳生成文件,存入SD卡,然后完文件里写 List 点, 文件带.kml 后缀。

图1.1 生成KML文件
写入kml gps点
public static String pullXMLCreate(String outDir, PathRecord pathRecord) {
        final String fileName = createKmlFile(outDir, pathRecord);
        StringWriter xmlWriter = new StringWriter();
        try {
//      // 方式一:使用Android提供的实用工具类android.util.Xml
//      XmlSerializer xmlSerializer = Xml.newSerializer();
            // 方式二:使用工厂类XmlPullParserFactory的方式
            XmlPullParserFactory factory = XmlPullParserFactory.newInstance();
            XmlSerializer xmlSerializer = factory.newSerializer();
            xmlSerializer.setOutput(xmlWriter);                // 保存创建的xml
            xmlSerializer.setFeature("http://xmlpull.org/v1/doc/features.html#indent-output", true);
            xmlSerializer.startDocument("utf-8", null);
            //给根节点kml添加属性
            xmlSerializer.setPrefix("xmlns", "http://www.opengis.net/kml/2.2");
            xmlSerializer.setPrefix("gx", "http://www.google.com/kml/ext/2.2");// <?xml version='1.0' encoding='UTF-8' standalone='yes' ?>
            xmlSerializer.startTag("", "kml");
            xmlSerializer.startTag("", "Document");
            xmlSerializer.startTag("", "Placemark");
            xmlSerializer.startTag("", "Style");
            xmlSerializer.startTag("", "LineStyle");
            xmlSerializer.startTag(null, "color");
            xmlSerializer.text("ff60ff00");//这里的颜色必须小写
            xmlSerializer.endTag(null, "color");
            xmlSerializer.startTag(null, "width");
            xmlSerializer.text("6");
            xmlSerializer.endTag(null, "width");
            xmlSerializer.endTag("", "LineStyle");
            xmlSerializer.endTag("", "Style");
            List<Gps> points = pathRecord.locationList;
            xmlSerializer.startTag(null, "LineString");
            xmlSerializer.startTag(null, "coordinates");
            xmlSerializer.text(createKMLPointStr(points));
            xmlSerializer.endTag(null, "coordinates");
            xmlSerializer.endTag(null, "LineString");
            xmlSerializer.endTag("", "Placemark");
            xmlSerializer.endTag("", "Document");
            xmlSerializer.endTag("", "kml");
            xmlSerializer.endDocument();
        } catch (XmlPullParserException e) {// XmlPullParserFactory.newInstance
            e.printStackTrace();
        } catch (IllegalArgumentException e) {    // xmlSerializer.setOutput
            e.printStackTrace();
        } catch (IllegalStateException e) {    // xmlSerializer.setOutput
            e.printStackTrace();
        } catch (IOException e) {// xmlSerializer.setOutput
            e.printStackTrace();
        } catch (Exception e) {
            e.printStackTrace();
        }
        String xmlStr = xmlWriter.toString();
        BaseFileUtil.writeStringToFile(fileName, xmlStr);
        return xmlStr;
    }public static String pullXMLCreate(String outDir, PathRecord pathRecord) {
        final String fileName = createKmlFile(outDir, pathRecord);
        StringWriter xmlWriter = new StringWriter();
        try {
//      // 方式一:使用Android提供的实用工具类android.util.Xml
//      XmlSerializer xmlSerializer = Xml.newSerializer();
            // 方式二:使用工厂类XmlPullParserFactory的方式
            XmlPullParserFactory factory = XmlPullParserFactory.newInstance();
            XmlSerializer xmlSerializer = factory.newSerializer();
            xmlSerializer.setOutput(xmlWriter);                // 保存创建的xml
            xmlSerializer.setFeature("http://xmlpull.org/v1/doc/features.html#indent-output", true);
            xmlSerializer.startDocument("utf-8", null);
            //给根节点kml添加属性
            xmlSerializer.setPrefix("xmlns", "http://www.opengis.net/kml/2.2");
            xmlSerializer.setPrefix("gx", "http://www.google.com/kml/ext/2.2");// <?xml version='1.0' encoding='UTF-8' standalone='yes' ?>
            xmlSerializer.startTag("", "kml");
            xmlSerializer.startTag("", "Document");
            xmlSerializer.startTag("", "Placemark");
            xmlSerializer.startTag("", "Style");
            xmlSerializer.startTag("", "LineStyle");
            xmlSerializer.startTag(null, "color");
            xmlSerializer.text("ff60ff00");//这里的颜色必须小写
            xmlSerializer.endTag(null, "color");
            xmlSerializer.startTag(null, "width");
            xmlSerializer.text("6");
            xmlSerializer.endTag(null, "width");
            xmlSerializer.endTag("", "LineStyle");
            xmlSerializer.endTag("", "Style");
            List<Gps> points = pathRecord.locationList;
            xmlSerializer.startTag(null, "LineString");
            xmlSerializer.startTag(null, "coordinates");
            xmlSerializer.text(createKMLPointStr(points));
            xmlSerializer.endTag(null, "coordinates");
            xmlSerializer.endTag(null, "LineString");
            xmlSerializer.endTag("", "Placemark");
            xmlSerializer.endTag("", "Document");
            xmlSerializer.endTag("", "kml");
            xmlSerializer.endDocument();
        } catch (XmlPullParserException e) {// XmlPullParserFactory.newInstance
            e.printStackTrace();
        } catch (IllegalArgumentException e) {    // xmlSerializer.setOutput
            e.printStackTrace();
        } catch (IllegalStateException e) {    // xmlSerializer.setOutput
            e.printStackTrace();
        } catch (IOException e) {// xmlSerializer.setOutput
            e.printStackTrace();
        } catch (Exception e) {
            e.printStackTrace();
        }
        String xmlStr = xmlWriter.toString();
        BaseFileUtil.writeStringToFile(fileName, xmlStr);
        return xmlStr;
    }
下面是生成的KML文件内容,其实还可以添加更多辅助信息到KML文件的,这里就略去了,直接上轨迹点,超级简单是不是?
奥森10km 轨迹图
<?xml version='1.0' encoding='utf-8' ?> <kml xmlns:xmlns="http://www.opengis.net/kml/2.2" xmlns:gx="http://www.google.com/kml/ext/2.2"> <Document> <Placemark> <Style> <LineStyle> <color>ff60ff00</color> <width>6</width> </LineStyle> </Style> <LineString> <coordinates> 116.259,40.028 116.154,40.0254 116.313,40.008 116.225,40.0616 116.755,40.0286 116.886,40.024 116.021,40.006 116.975,40.0674 116.978,40.071 116.552,40.022 116.042,40.096 116.086,40.0965 116.537,40.013 116.783,40.034 116.328,40.0144 116.322,40.0386 116.93,40.0185 116.043,40.0696 116.049,40.002 116.297,40.0566 116.688,40.047 116.265,40.09 116.439,40.038 116.383,40.038 116.927,40.05 116.366,40.0045 116.043,40.052 116.752,40.016 116.218,40.089 116.082,40.0926 116.406,40.059 116.168,40.0984 116.946,40.017 116.405,40.029 116.593,40.068 116.727,40.005 116.365,40.0275 116.865,40.0304 116.389,40.066 116.36,40.019 116.684,40.03 116.724,40.034 116.432,40.065 116.195,40.049 116.908,40.019 116.541,40.07 116.795,40.097 116.124,40.025 116.607,40.0515 116.411,40.0044 116.638,40.071 116.249,40.0315 116.436,40.048 116.831,40.067 116.837,40.006 116.145,40.0294 116.447,40.0524 116.067,40.0514 116.626,40.008 116.834,40.0 116.977,40.035 116.609,40.059 116.18,40.0545 116.224,40.031 116.802,40.05 116.247,40.0106 116.56,40.045 116.12,40.0705 116.893,40.001 116.273,40.0184 116.335,40.082 116.825,40.034 116.551,40.011 116.676,40.047 116.832,40.072 116.78,40.0645 116.662,40.091 116.294,40.0145 116.78,40.06 116.938,40.06 116.502,40.0564 116.715,40.0275 116.466,40.072 116.215,40.0674 116.626,40.018 116.38,40.0525 116.572,40.0304 116.488,40.0754 116.03,40.021 116.482,40.0946 116.939,40.0155 116.548,40.053 116.374,40.0964 116.774,40.088 116.918,40.0146 116.09,40.0366 116.109,40.084 116.729,40.087 116.702,40.096 116.1,40.085 116.661,40.0464 116.397,40.0456 116.155,40.001 116.923,40.089 116.705,40.064 116.442,40.059 116.704,40.026 116.389,40.007 116.665,40.094 116.897,40.045 116.78,40.044 116.456,40.091 116.28,40.092 116.106,40.067 116.186,40.0955 116.521,40.087 116.836,40.037 116.854,40.037 116.071,40.095 116.98,40.0775 116.378,40.009 116.69,40.0484 116.825,40.008 116.8,40.0224 116.256,40.0016 116.344,40.079 116.34,40.062 116.906,40.011 116.829,40.093 116.13,40.0196 116.309,40.069 116.877,40.064 116.802,40.0794 116.574,40.08 116.808,40.034 116.352,40.033 116.51,40.085 116.236,40.035 116.868,40.0324 116.469,40.071 116.005,40.0684 116.168,40.077 116.987,40.028 116.841,40.0486 116.743,40.056 116.557,40.077 116.326,40.06 116.777,40.032 116.786,40.0525 116.934,40.078 116.371,40.047 116.122,40.0255 116.511,40.041 116.049,40.091 116.899,40.01 116.86,40.084 116.081,40.032 116.355,40.0554 116.069,40.0764 116.927,40.065 116.782,40.085 116.479,40.005 116.111,40.063 116.576,40.033 116.917,40.013 116.77,40.043 116.84,40.046 116.614,40.0235 116.388,40.037 116.313,40.0116 116.165,40.027 116.502,40.085 116.99,40.0 116.133,40.0826 116.7,40.0794 116.562,40.0204 116.544,40.0515 116.613,40.055 116.22,40.0924 116.587,40.0174 116.635,40.09 116.299,40.015 116.013,40.011 116.639,40.0876 116.483,40.081 </coordinates> </LineString> </Placemark> </Document> </kml>
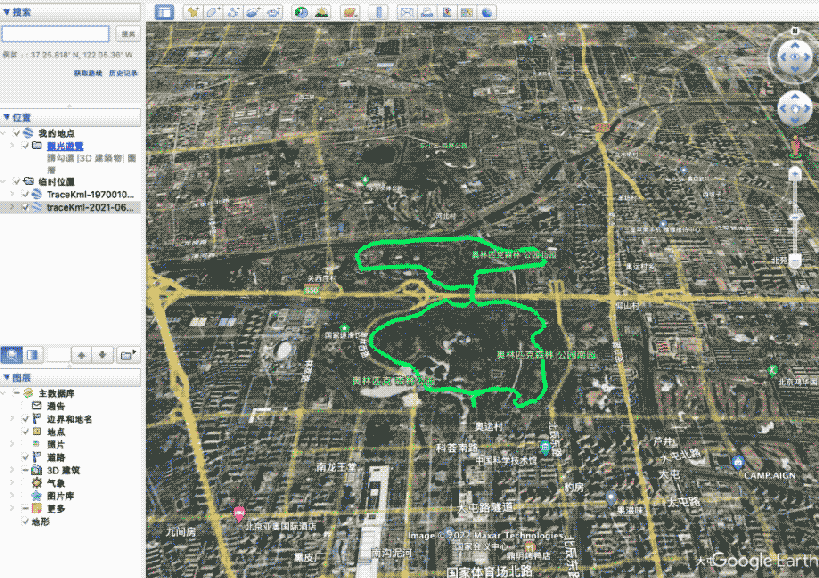
直接将kml文件拖到Google 地球上,铛铛铛当就展现出来啦。

图1.2 Google地球展示kml文件
生成的kml标准文件,理论上可以导入到其它支持Share的APP,就可以进行数据迁移了。
以上就是Android APP开发KML轨迹导出教程示例的详细内容,更多关于Android APP导出KML轨迹的资料请关注本网站其它相关文章!
您可能感兴趣的文章:
- Android实现简单的自定义ViewGroup流式布局
- Android开发X Y轴Board的绘制教程示例
- MPAndroidChart 自定义图表绘制使用实例
- MPAndroidChart绘制自定义运动数据图表示例详解
- Android MPAndroidChart绘制原理
- Android画图实现MPAndroidchart折线图示例详解
- Android MPChart自定义睡眠泳道图教程示例
