目录
- 高动态范围成像
- 一、引言
- 二、曝光序列
- 三、代码演示
- 四、解释
- 1. 加载图像和曝光时间
- 2. 估计相机响应
- 3. 形成HDR图像
- 4. 对 HDR 图像进行色调映射
- 5. 实现曝光融合
- 五、补充资源
高动态范围成像
一、引言
如今,大多数数字图像和成像设备每通道使用 8 位整数表示灰度,因此将设备的动态范围限制在两个数量级(实际上是 256 级),而人眼可以适应变化十个数量级的照明条件。当我们拍摄真实世界场景的照片时,明亮区域可能曝光过度,而黑暗区域可能曝光不足,因此我们无法使用单次曝光捕捉所有细节。 HDR 成像适用于每通道使用超过 8 位(通常为 32 位浮点值)的图像,允许更宽的动态范围。获取 HDR 图像的方法有很多种,但最常见的一种是使用以不同曝光值拍摄的场景照片。要结合这些曝光,了解相机的响应函数以及估计它的算法很有用。混合 HDR 图像后,必须将其转换回 8 位才能在普通显示器上查看。这个过程称为色调映射。当场景或相机的对象在镜头之间移动时,会出现额外的复杂性,因为应该配准和对齐具有不同曝光的图像。在本教程中,我们将展示如何从曝光序列中生成和显示 HDR 图像。在我们的例子中,图像已经对齐并且没有移动对象。我们还展示了一种称为曝光融合的替代方法,它可以产生低动态范围的图像。 HDR 管道的每个步骤都可以使用不同的算法来实现,因此请查看参考手册以了解所有这些。
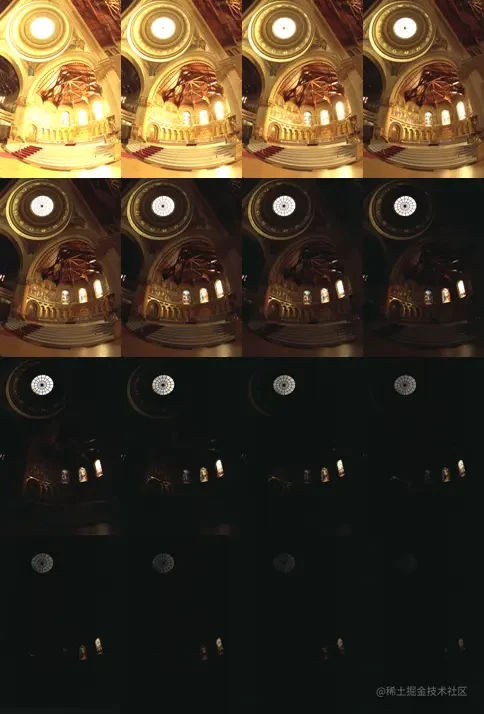
二、曝光序列
三、代码演示
from __future__ import print_function
from __future__ import division
import cv2 as cv
import numpy as np
import argparse
import os
def cv_show(name, img):
    cv.imshow(name, img)
    cv.waitKey(0)
    cv.destroyAllWindows()
def compare(imgs):
# for i in range(len(imgs)):
# imgs[i][:,-3:-1,:] = [255,255,255]
res = np.hstack(imgs)
cv_show('Compare', res)def loadExposureSeq(path):
images = []
times = []
with open(os.path.join(path, 'list.txt')) as f:
content = f.readlines()
for line in content:
tokens = line.split()
images.append(cv.imread(os.path.join(path, tokens[0])))
# 便于之后的逆CRF操作
times.append(1 / float(tokens[1]))
return images, np.asarray(times, dtype=np.float32)# jupyter 难以手动输入参数,故使用绝对路径
#parser = argparse.ArgumentParser(description='Code for High Dynamic Range Imaging tutorial.')
# parser.add_argument('--input', type=str, help='Path to the directory that contains images and exposure times.')
# args = parser.parse_args()
# if not args.input:
# parser.print_help()
# exit(0)
# images, times = loadExposureSeq(args.input)
images, times = loadExposureSeq('exposures/')
calibrate = cv.createCalibrateDebevec()
response = calibrate.process(images, times)
merge_debevec = cv.createMergeDebevec()
hdr = merge_debevec.process(images, times, response)
tonemap = cv.createTonemap(2.2)
ldr = tonemap.process(hdr)
merge_mertens = cv.createMergeMertens()
fusion = merge_mertens.process(images)cv.imwrite('fusion.png', fusion * 255)
cv.imwrite('ldr.png', ldr * 255)
cv.imwrite('hdr.hdr', hdr)True
- 代码:github.com/opencv/open…
- 样本数据:github.com/opencv/open…
四、解释
1. 加载图像和曝光时间
images, times = loadExposureSeq('exposures/')# 查看数据集中曝光图像个数 len(images)
16
首先我们从用户自定义文件夹中(此处我采用了教程提供的数据集并将其放置到了同目录下便于载入)载入输入图像以及其曝光时间。文件夹中需要包含图像和list.txt文本文件,其中包含了文件名称和反曝光时间
提供的图像数据集的列表如下:
memorial00.png 0.03125
memorial01.png 0.0625
...
memorial15.png 1024
2. 估计相机响应
calibrate = cv.createCalibrateDebevec() response = calibrate.process(images, times)
- 用法如下:
cv.createCalibrateDebevec( [, samples[, lambda_[, random]]] ) -> retval
- 参数含义:
- samples :number of pixel locations to use
- lambda :smoothness term weight. Greater values produce smoother results, but can alter the response.
- random :if true sample pixel locations are chosen at random, otherwise they form a rectangular grid.
很多 HDR 构建算法都需要了解相机响应函数(CRF)。 我们使用一种校准算法来估计所有 256 个像素值的逆 CRF
3. 形成HDR图像
merge_debevec = cv.createMergeDebevec()
# 利用逆CRF形成HDR图像
hdr = merge_debevec.process(images, times, response)
- 用法如下:
cv.createMergeMertens( [, contrast_weight[, saturation_weight[, exposure_weight]]] ) -> retval
- 参数含义:
- contrast_weight :contrast measure weight. See MergeMertens.
- saturation_weight: saturation measure weight
- exposure_weight :well-exposedness measure weight
我们使用 Debevec 的加权方案,使用上一项中计算的响应来构建 HDR 图像。
4. 对 HDR 图像进行色调映射
tonemap = cv.createTonemap(2.2)
ldr = tonemap.process(hdr)
cv_show('Result', ldr)- 用法如下: cv.createTonemap( [, gamma] ) -> retval
- 参数含义:
- gamma :positive value for gamma correction. Gamma value of 1.0 implies no correction, gamma equal to 2.2f is suitable for most displays. Generally gamma > 1 brightens the image and gamma < 1 darkens it.
由于我们想在普通 LDR 显示器上看到我们的结果,我们必须将 HDR 图像映射到 8 位范围,保留大部分细节。 这是色调映射方法的主要目标。 我们使用带有双边滤波的色调映射器,并将 2.2 设置为 gamma 校正的值。
5. 实现曝光融合
merge_mertens = cv.createMergeMertens()
fusion = merge_mertens.process(images)
如果我们不需要 HDR 图像,还有另一种方法可以合并我们的曝光。 这个过程称为曝光融合,并产生不需要伽马校正的 LDR 图像。 它也不使用照片的曝光值。
compare([ldr,fusion])
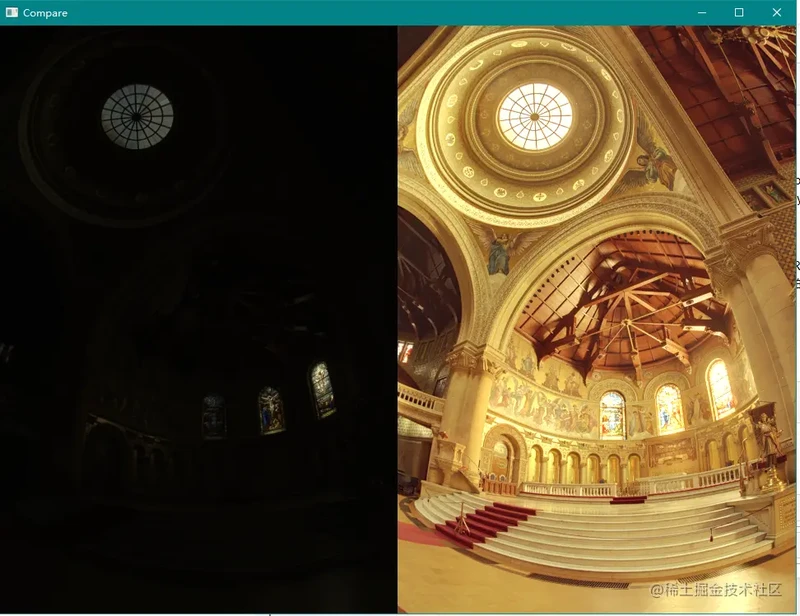
左边是对HDR图像直接进行色调映射的结果,只会保留大部分细节,右边图像是使用所有输入图像序列进行图像曝光融合的结果
请注意,HDR 图像不能以一种常见的图像格式存储,因此我们将其保存为 Radiance 图像 (.hdr)。 此外,所有 HDR 成像函数都返回 [0, 1] 范围内的结果,因此我们应该将结果乘以 255。您可以尝试其他色调映射算法:cv::TonemapDrago、cv::TonemapMantiuk 和 cv::TonemapReinhard 您还可以调整 您自己的照片的 HDR 校准和色调映射方法参数。
# 修改gamma使整幅图像变亮
tonemap = cv.createTonemap(10)
ldr = tonemap.process(hdr)
cv_show('Result', ldr)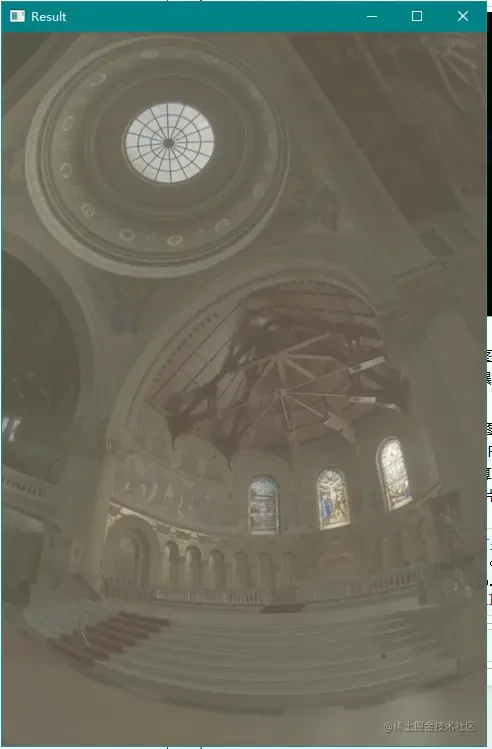
五、补充资源
- Paul E Debevec and Jitendra Malik. Recovering high dynamic range radiance maps from photographs. In ACM SIGGRAPH 2008 classes, page 31. ACM, 2008. [57]
- Mark A Robertson, Sean Borman, and Robert L Stevenson. Dynamic range improvement through multiple exposures. In Image Processing, 1999. ICIP 99. Proceedings. 1999 International Conference on, volume 3, pages 159–163. IEEE, 1999. [207]
- Tom Mertens, Jan Kautz, and Frank Van Reeth. Exposure fusion. In Computer Graphics and Applications, 2007. PG'07. 15th Pacific Conference on, pages 382–390. IEEE, 2007. [170]-range_imaging
- Recovering High Dynamic Range Radiance Maps from Photographs (webpage) www.pauldebevec.com/Research/HD…
到此这篇关于Python中OpenCV Tutorials 20 高动态范围成像的文章就介绍到这了,更多相关OpenCV高动态范围成像内容请搜索本网站以前的文章或继续浏览下面的相关文章希望大家以后多多支持本网站!
您可能感兴趣的文章:
- python使用OpenCV获取高动态范围成像HDR