目录
- 前言
- 一、el-table实现可拖拽移动列
- 1.调取接口获取数据table数据
- 2.参考接口表格字段mock页面要调整的数据
- 3.引入mock的字段顺序h和相关第三方表格拖拽
- 4.el-table渲染相关数据
- 5.el-table拖拽实现
- 二、el-table表格动态排序字段
- 1.根据mock的动态表头实现一个控制字段的表格
- 2.相关方法
- 3.表格字段下移方法
- 总结
前言
背景
公司给了一个需求,需要拖拽表格和自定义表格字段,于是我就开始网上冲浪,于是自己封装了一套方法,分享给大家,有不明白的可以私信我或者发在评论区
el-table自带支持按列排序,但是当用户需要自己拖拽进行排序时,现有组件无法满足。
是时候安利五脏俱全的js库了,SortableJS
简单易用,官方文档上有简单列表排序,多列表相互拖拽,克隆,禁止sorting等多种demo,现在只记录关于简单排序的使用方法
SortableJS官网
一、el-table实现可拖拽移动列
需要安装插件Sortable.js
npm i  sortablejs --save
或者
yarn add sortablejs --save
1.调取接口获取数据table数据
this.$axios
        .post("personnel/list", formData)
        .then((response) => {
          // console.log(response);
          this.dynamicTableData = response.data;
        }))
接口数据
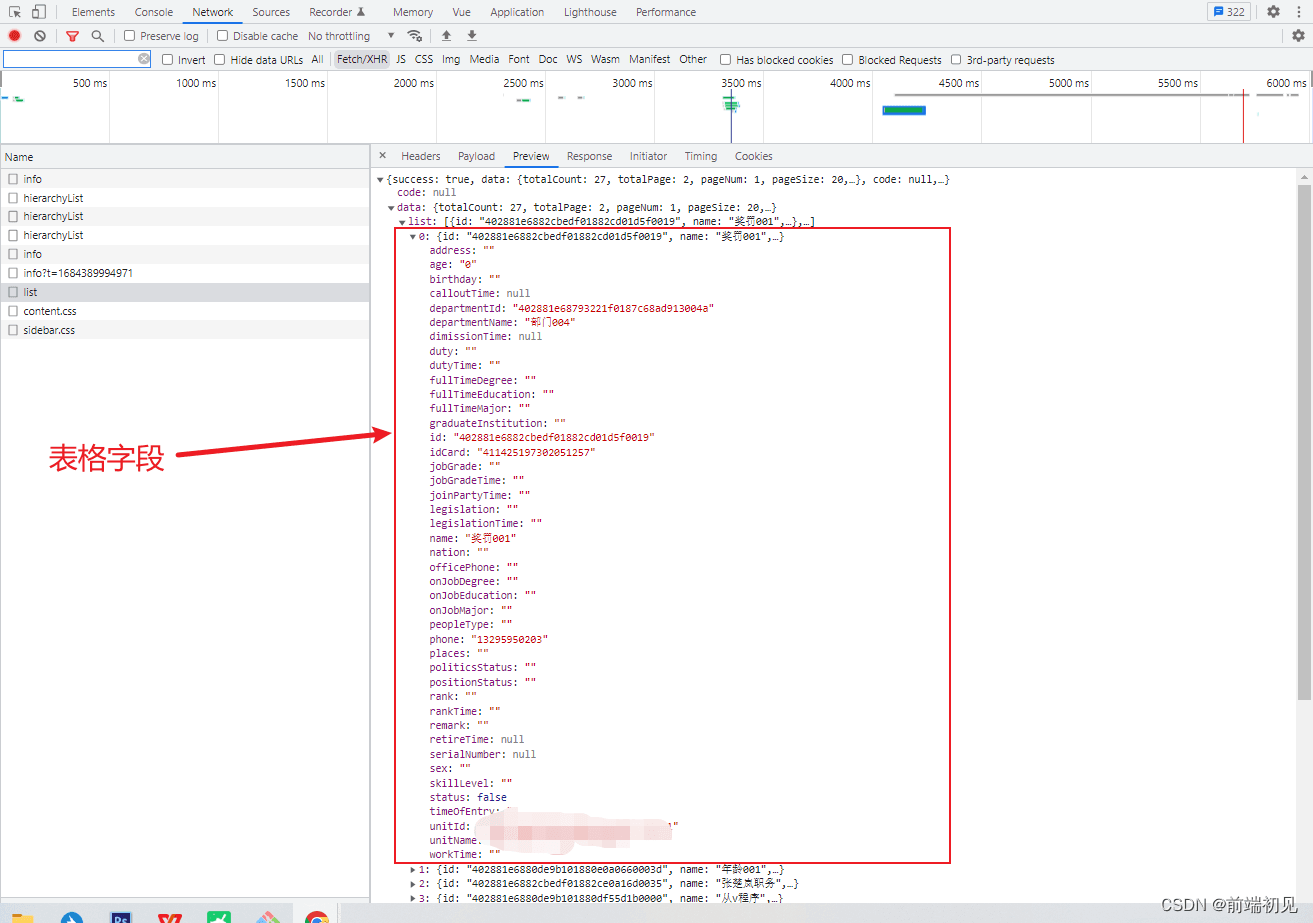
2.参考接口表格字段mock页面要调整的数据
注意这些数据prop是对应接口的字段的,以下数据的顺序会控制页面显示顺序
动态表头数据
export default [
  {
    disabled: true,
    isCheck: true,
    fixed:true,
    width: "100px",
    label: "姓名",
    prop: "name"
  },
  {
    disabled: false,
    isCheck: true,
    width: "180px",
    label: "单位",
    prop: "unitName"
  },
  {
    disabled: false,
    isCheck: true,
    width: "80px",
    label: "部门",
    prop: "departmentName"
  },
  {
    disabled: false,
    isCheck: true,
    width: "80px",
    label: "性别",
    prop: "sex"
  },
  {
    disabled: false,
    isCheck: true,
    width: "80px",
    label: "出生年月",
    prop: "birthday"
  },
  {
    disabled: false,
    isCheck: true,
    width: "100px",
    label: "籍贯",
    prop: "places"
  },
  {
    disabled: false,
    isCheck: true,
    width: "140px",
    label: "参加工作时间",
    prop: "workTime"
  },
  {
    disabled: false,
    isCheck: true,
    width: "100px",
    label: "行政职务",
    prop: "duty"
  },
  {
    disabled: false,
    isCheck: true,
    width: "140px",
    label: "行政职务时间",
    prop: "dutyTime"
  },
  {
    disabled: false,
    isCheck: true,
    width: "80px",
    label: "行政职级",
    prop: "jobGrade"
  },
  {
    disabled: false,
    isCheck: true,
    width: "140px",
    label: "行政职级时间",
    prop: "jobGradeTime"
  },
  {
    disabled: false,
    isCheck: true,
    width: "110px",
    label: "等级",
    prop: "rank"
  },
  {
    disabled: false,
    isCheck: true,
    width: "80px",
    label: "等级时间",
    prop: "rankTime"
  },
  {
    disabled: false,
    isCheck: true,
    width: "100px",
    label: "法律职务",
    prop: "legislation"
  },
  {
    disabled: false,
    isCheck: true,
    width: "140px",
    label: "法律职务时间",
    prop: "legislationTime"
  },
  {
    disabled: false,
    isCheck: true,
    width: "80px",
    label: "全日制学历",
    prop: "fullTimeEducation"
  },
  {
    disabled: false,
    isCheck: true,
    width: "80px",
    label: "全日制学位",
    prop: "fullTimeDegree"
  },
  {
    disabled: false,
    isCheck: true,
    width: "80px",
    label: "全日制专业",
    prop: "fullTimeMajor"
  },
  {
    disabled: false,
    isCheck: true,
    width: "100px",
    label: "政治面貌",
    prop: "politicsStatus"
  },
];
3.引入mock的字段顺序h和相关第三方表格拖拽
import Sortable from "sortablejs";
// 引入Sortable表格拖拽插件
import schemas from "./DynamicTableLabels";
// 引入mock的数据
4.el-table渲染相关数据
- 注意点:
- el-table组件中的data绑定的是接口字段
- el-table-column通过遍历mock的数据渲染prop,lable, 字段和接口数据需要一一对应,这样就可以实现完成渲染
- 复选框和序号是固定
    <el-table
      v-if="isShowSchemaTable"
      :data="tableData.list"
      :height="getTableHeight"
      style="margin-bottom: 5px"
      ref="schema-table"
      class="ELtable"
      size="small"
      stripe
      :key="tableKey"
      :row-key="
        (row) => {
          return row.id;
        }
      "
      id="outTable"
      @select="handleSelect"
      @select-all="handleSelectAll"
      @selection-change="updateSelection"
    >
      <!-- 复选框-->
      <el-table-column type="selection" width="55" :reserve-selection="true">
      </el-table-column>
      <el-table-column
        label="序号"
        type="index"
        align="center"
        fixed
        width="50px"
      ></el-table-column>
        <el-table-column
        v-for="(item, index) in schemas"
        v-if="item.isCheck && item.prop !== 'remark'"
        :label="item.label"
        :prop="item.prop"
        :width="item.width"
        align="center"
      >
        <template slot-scope="sc">
          <div>
            <span v-if="dateFileds.includes(item.prop)">
              {{ getFormatDate(sc.row[item.prop]) }}
            </span>
            <span v-else>{{ sc.row[item.prop] }}</span>
          </div>
        </template>
      </el-table-column>
    </el-table>
5.el-table拖拽实现
挂载时开始调用列拖拽方法
  async mounted() {
    //表格拖拽方法
    this.columnDrop();
  },
相关方法封装
    /**
     * 列拖拽
     */
    columnDrop() {
      const _this = this;
      // console.log("数据", this.schemas);
      const wrapperTr = document.querySelector(".el-table__header-wrapper tr");
      this.sortable = Sortable.create(wrapperTr, {
        animation: 180,
        delay: 0,
        onEnd: (evt) => {
          const empty = 2;
          // 跳过显示的列数量,如开头我们用了一个多选框,h和序号
          const oldItem = this.schemas[evt.oldIndex - empty];
          this.schemas.splice(evt.oldIndex - empty, 1);
          this.schemas.splice(evt.newIndex - empty, 0, oldItem);
          _this.reDrawTable();
          // 每一次拖拽后都要重绘一次
        },
      });
    },
    /**
     * 触发表格重绘
     */
    reDrawTable() {
      this.tableKey = Math.random();
      this.$nextTick(() => {
        // this.rowDrop();
        this.columnDrop();
      });
    },
二、el-table表格动态排序字段
1.根据mock的动态表头实现一个控制字段的表格
- 注意
- el-table是mock的数据
- 排序的上移和下移传入点击事件传入索引
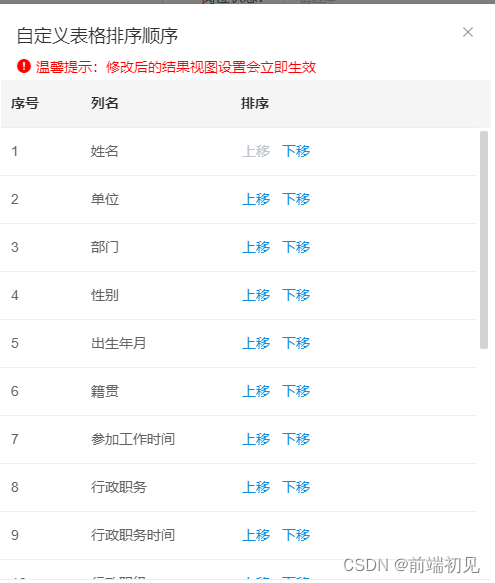

    <el-dialog
      title="自定义表格排序顺序"
      :visible.sync="dialogVisibleShow"
      append-to-body
      :close-on-click-modal="false"
      width="500px"
      border
      id="uptishi"
    >
      <p style="font-size: 14px; color: red; margin: 0px 0 5px 15px">
        <i style="font-size: 16px" class="el-icon-warning"></i>
        温馨提示:修改后的结果视图设置会立即生效
      </p>
      <el-table id="uptable" :data="schemas" ref="curtable" height="500">
        <el-table-column type="index" label="序号" width="80"></el-table-column>
        <el-table-column prop="label" align="cneter" label="列名" width="150">
        </el-table-column>
        <el-table-column label="排序" min-width="150">
          <template slot-scope="scope">
            <el-button
              type="text"
              style="padding: 0"
              :disabled="scope.$index == 0"
              @click="moveUpward(scope.row, scope.$index)"
              >上移</el-button
            >
            <el-button
              type="text"
              style="padding: 0"
              :disabled="scope.$index + 1 == schemas.length"
              @click="moveDown(scope.row, scope.$index)"
              >下移</el-button
            >
          </template>
        </el-table-column>
      </el-table>
    </el-dialog>
2.相关方法
    /**
     * 表格字段上移方法
     */
    moveUpward(row, index) {
      // schemas 列数据
      if (index > 0) {
        let upData = this.schemas[index - 1];
        this.schemas.splice(index - 1, 1);
        this.schemas.splice(index, 0, upData);
        console.log("移动成功");
      } else {
        console.log("第一条数据");
        this.$message({
          message: "已经是第一条,上移失败",
          type: "error",
        });
      }
    },
3.表格字段下移方法
    /**
     * 表格字段下移方法
     */
    moveDown(row, index) {
      if (index + 1 == this.schemas.length) {
        this.$message({
          message: "已经是最后一条,下移失败",
          type: "error",
        });
      } else {
        let downData = this.schemas[index + 1];
        this.schemas.splice(index + 1, 1);
        this.schemas.splice(index, 0, downData);
      }
    },
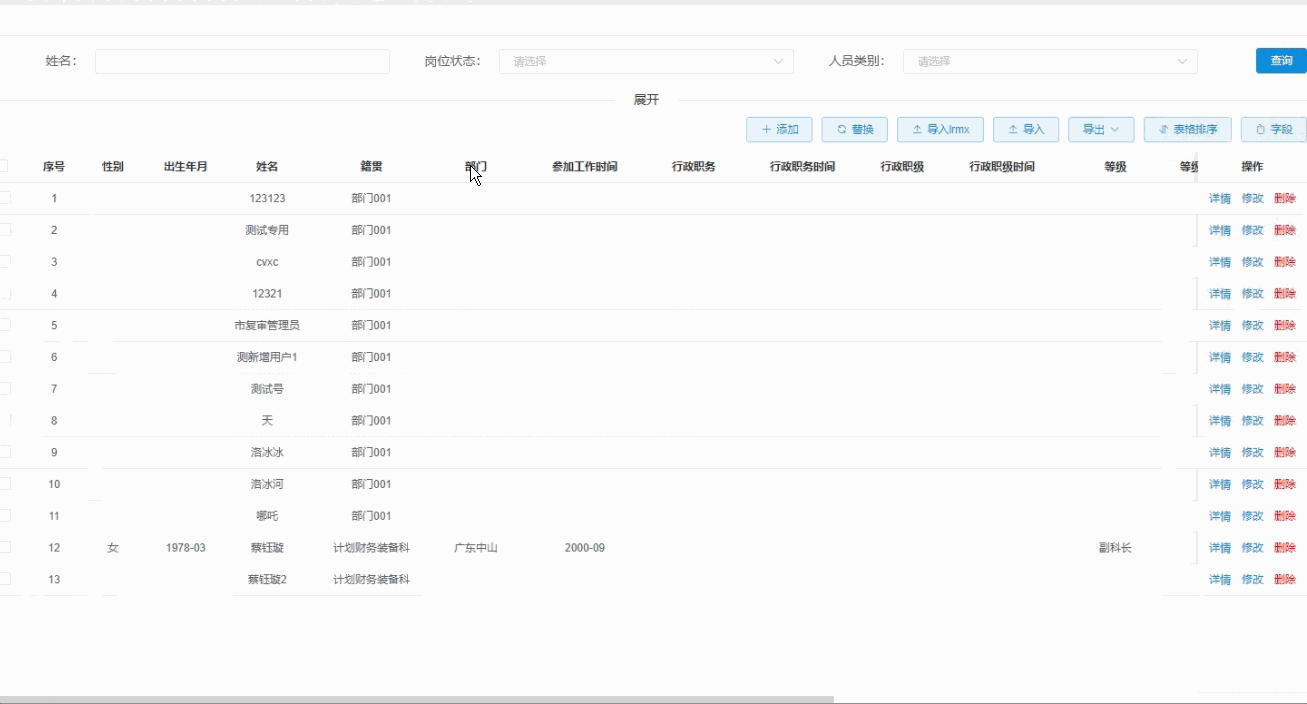
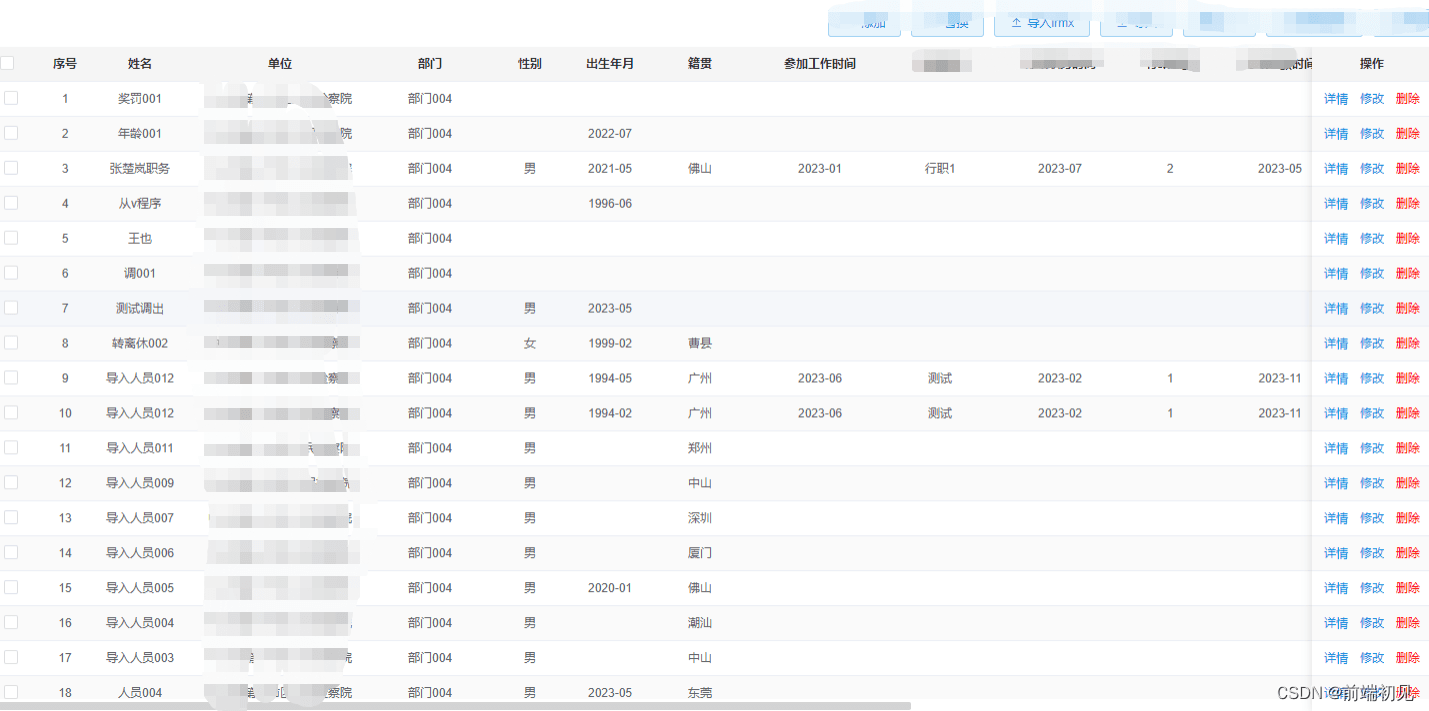
效果图:

总结
到此这篇关于vue中el-table实现可拖拽移动列和动态排序字段的文章就介绍到这了,更多相关vue 可拖拽移动列和动态排序字段内容请搜索本网站以前的文章或继续浏览下面的相关文章希望大家以后多多支持本网站!
您可能感兴趣的文章:
- 基于vue v-for 循环复选框-默认勾选第一个的实现方法
- Vue el-table复选框全部勾选及勾选回显功能实现